❏ 목적: 제스쳐를 통한 제어
(맨 아래 github 들어가면 모든 코드 확인가능함)
❏ Mediapipe Gesture Recognition 간단설명
- 이미지로 손을 학습하나 생각할 수 있으나 그게아니였다..
- 손에 대한 관절 포인트(= landmark) 21개를 이미 다 학습을 시켜놓아서 손을 보면 실시간으로 손의 좌표(x,y,z) 따주는것임.
where, x는 가로, y 세로, z 는 카메라로 부터의 거리. - 학습에 사용되는 feature = landmark data[21 *3] + landmark visibility[21]+ 손가락 각도 데이터[15개] =총 99개
❏ 모델 : CNN- LSTM
- 데이터를 수집을 많이 한것도 아니고 모델이 깊은것도 아닌데. 생각보다 잘되더라..( 카메라 각도와 손의 각도만 잘맞으면)
- epcoh 30으로 학습햇음....
## torch 모듈에서는 Super().__init__() 을 해줘야 한다.

import torch.nn as nn  # Neural Network, activation function 모듈의 기본 클래스
import torch

class CNN_LSTM(nn.Module):
    def __init__(self,input_size,output_size,units):
        super(CNN_LSTM,self).__init__()

        self.conv1d=nn.Conv1d(
            in_channels=input_size,
            out_channels=output_size,
            kernel_size=3,
            stride=1,
            padding=0
        )

        self.lstm=nn.LSTM(
            input_size=64,
            hidden_size=units,
            num_layers=1,
            dropout=0.2,
            batch_first=True) # if True = (batch, seq, features)

        self.Relu=nn.ReLU()

        self.Linear_1=nn.Linear(
            in_features=32,
            out_features=4
        )

        self.softmax=nn.Softmax()

    def forward(self,x):
        # x.shape=(batch_size,seq_len,feautres)
        #          -> (batch_size,feautres,seq_len)
        x=x.permute(0,2,1)
        x=self.conv1d(x)
        x=self.Relu(x)


        x=x.permute(0,2,1)  # torch.Size([64,28,64])
        h_n, c_n=self.lstm(x)

        x=self.Linear_1(h_n[:,-1,:])

        x=self.softmax(x)
        return x
❏ 인식동작 4개 :
Right, Left, Clockwise, Anti Clockwise
❏ 데이터수집 : 직접함
- 데이터 수집을 카메라에서 수직이 되도록 수행함. 그래서 test할때 수직이 되는 위치에서는 인식 잘됨.. 그외적인건.. 데이터 더 모아야지 뭐..
- 한 class 당 5분 정도 수집함. ?
- 아래는 데이터를 수집하는 코드임. 여기서 주의해야 할 부분은 데이터 수집할때 각각 다른 데이터를 수집할때 class_num= 숫자 를 바꿔야 한다. 숫자에 따라 label이 달려있음으로.
- 데이터 수집시 .py파일이 아닌, .ipynb로 했음. (---- 기준으로 하나의 셀임)
import cv2
import mediapipe as mp
import numpy as np
import pandas as pd
import sys


print("Python version:", sys.version)
print("cv2 version:", cv2.__version__)
print("mediapipe version", mp.__version__)
print("pandas version:", pd.__version__)
print("numpy version:", np.__version__)

-----------------------------------------------------------------------------------

## Setting Class number and Hyperparameters
class_num=0     # you must change class_num when gathering geture.
max_num_hands=1  # Number of hands recognized


gesture={
    0 : 'Right',
    1 : 'Left',
    2 : 'Turn Clockwise',
    3 : 'Turn Anticlockwise'

}


-----------------------------------------------------------------------------------

# Mediapipe hands model

mp_hands = mp.solutions.hands
mp_drawing = mp.solutions.drawing_utils
hands = mp_hands.Hands(
    max_num_hands=max_num_hands,
    min_detection_confidence=0.5,
    min_tracking_confidence=0.5)

-----------------------------------------------------------------------------------


# make Data set code

# 만약 기존의 데이터 파일에서 붙여서 계속 데이터를 모으고 싶다면, 아래 파일명만 바꾸면 됨.
# default_array = np.genfromtxt('./data/start_file.csv', delimiter=',')

# 기존의 데이터 없이 데이터 수집하는 경우.
default_array=np.array(range(100),dtype='float64')

webcam = cv2.VideoCapture(0)  # 몇번째 카메라인지 설정.

while webcam.isOpened():  # webcap 열려있는지 확인.
    seq=[]
    status, frame =webcam.read()

    if not status:
        continue

    frame=cv2.flip(frame,1)
    frame = cv2.cvtColor(frame, cv2.COLOR_BGR2RGB)
    result = hands.process(frame)
    frame = cv2.cvtColor(frame, cv2.COLOR_RGB2BGR)

    if result.multi_hand_landmarks is not None:

        # 손에 대한 정보 실시간(프레임 느낌)으로 계속 가져옴.
        # res 에 21개의 (x,y,z) 정보가 들어있음( 각각 관절의 위치 값들)
        for res in result.multi_hand_landmarks:
            joint = np.zeros((21, 4))


            # 21개의 관절 포인트에 대해 joint 할당함.
            for j, lm in enumerate(res.landmark):

                # x ,y, z(distance between camera and hand)
                joint[j] = [lm.x, lm.y, lm.z, lm.visibility] # [21,4]


            # Compute angles between joints
            v1 = joint[[0,1,2,3,0,5,6,7,0,9,10,11,0,13,14,15,0,17,18,19],:] # Parent joint
            v2 = joint[[1,2,3,4,5,6,7,8,9,10,11,12,13,14,15,16,17,18,19,20],:] # Child joint
            v = v2 - v1 # [20,4]


            # Normalize v
            v = v / np.linalg.norm(v, axis=1)[:, np.newaxis]   #[20,4]


            # Get angle using arcos of dot product
            # angle [15,1]
            angle = np.arccos(np.einsum('nt,nt->n',
                v[[0,1,2,4,5,6,8,9,10,12,13,14,16,17,18],:],
                v[[1,2,3,5,6,7,9,10,11,13,14,15,17,18,19],:]))


            angle = np.degrees(angle) # Convert radian to degree
            angle = np.array([angle], dtype=np.float32)

            #  'angle + class_num'
            #   angle_label [16,1]
            angle_label = np.append(angle, class_num)

            # joint[21,4] + angle_label[16,1]
            # joint_angle_label [100,]
            joint_angle_label = np.concatenate([joint.flatten(), angle_label])


            mp_drawing.draw_landmarks(frame, res, mp_hands.HAND_CONNECTIONS)


            # np.array() 형태로 계속 붙음.(넘파이 형태임.)
            seq.append(joint_angle_label)


        data=np.array(seq)
        default_array = np.vstack((default_array, data))
        # print('file shape : ',default_array.shape)


    cv2.imshow('Dataset', frame)
    if cv2.waitKey(1) == ord('q'):
        break


# save file
np.savetxt('../main_data/data_gesture_'+gesture[class_num]+'.csv', default_array[1:,:], delimiter=',')
❏ 코드 짜며 배운점 (중요부분).
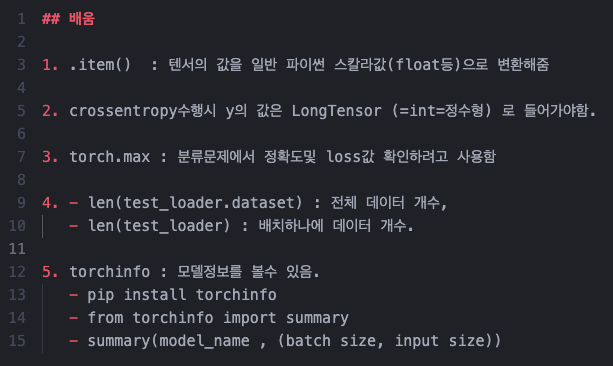
- .item() 항상 pytorch 하면 안빠지고 나오는 부분인데, 텐서의 값을 파이썬 스칼라 값으로 변환하는 역할이더라..(별거없었다..)
(예전에는 저거 찍으면 딕셔너리 형태로 저장된 accuracy, loss 값 등이 load 되는줄 알았다..) - y값 LongTensor 설정 안해서 저기서 고생했었다.. 예전에 하던 분류문제들은 데이터 로드하면 일반적으로 int형이 였나보다..
x값은 Flaot으로 들어가야한다. - torch.max 및 torch.argmax 를 주로 분류문제에서 사용을 하는데, 아래 예시 코드(3번 예시 참고)를 보면 이해가 바로 될것이다.
- 정확도 및 loss 를 계산할 때 DataLoader 에서 할당 받은 변수에 .dataset을 하는 이유가 궁금했다. (4번 예시 참고)
len(train_loader.dataset) : train_loader의 전체 데이터 개수
len(train_loader) : 배치하나에 데이터 개수. - torchinfo : 모델정보를 볼 수 있더라.(5번 예시 참고)
## 3번 예시

import torch

# 예제 텐서 생성
tensor_example = torch.tensor([1, 3, 5, 2, 4])

# torch.argmax 사용
argmax_index = torch.argmax(tensor_example)
print("argmax_index:", argmax_index.item())  # item()을 사용하여 정수 값으로 변환


# torch.max 사용
max_value, max_index = torch.max(tensor_example, dim=0)
# 파라미터 설명
# dim=1: 행을 따라 최대값 찾기, dim=0: 열을 따라 최대값 찾기
# keepdim=True: 출력 텐서각각을 크기가1인 차원으로 유지함.
# keepdim=False: 출력 텐서 각각의 크기가 1인 차원을 삭제함.
print("max_value:", max_value.item(), "max_index:", max_index.item())

출력: argmax_index: 2
     max_value: 5 max_index: 2
## 4번 예시

##
##   데이터셋 생성
##

dataset=CustomDataset(window_size=30, Folder_dir='./main_data/')

# train,test 분리
val_ratio=0.2
val_size=int(val_ratio*len(dataset))

train_size=len(dataset)-val_size
train_dataset, val_dataset=random_split(dataset,[train_size,val_size])


train_dataloader=DataLoader(train_dataset,batch_size=64,shuffle=True)  # shuffle: 미니배치들이 에폭마다 섞이는 유무.
val_dataloader=DataLoader(val_dataset,batch_size=64,shuffle=False)  # shuffle: 미니배치들이 에폭마다 섞이는 유무.

print("Dataset size:",len(dataset),'\n')
print("Traing data size:",len(train_dataset))
print("Traing data size (.dataset):",len(train_dataloader.dataset))
print("Validation data size:",len(val_dataset),'\n')
print("Traing data # of batch:",len(train_dataloader))
print("Validation # of batch:",len(val_dataloader))


#출력:
Dataset size: 30791

Traing data size: 24633
Traing data size (.dataset): 24633
Validation data size: 6158

Traing data # of batch: 385
Validation # of batch: 97
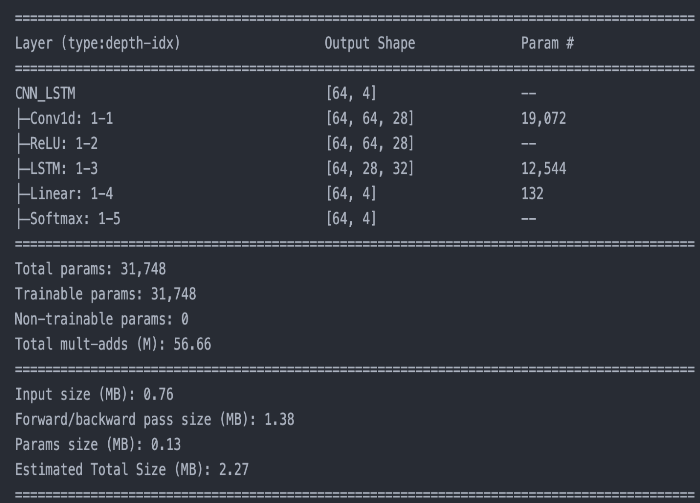
from torchinfo import summary
summary(CNN_LSTM_model, (64,30,99)) # 파라미터: ( model_name, (batch_size, input_size) )
❏ 테스트 영상.

❏ 자세한 설명은 아래 github 들어가면 확인할 수 있으며, 수집 데이터와 모델을 다 올려 놓았다.
깃허브 : https://github.com/YongTaeIn/Gesture_Recognition/tree/update
GitHub - YongTaeIn/Gesture_Recognition: Gesture_Recognition using mediapipe and Pytorch
Gesture_Recognition using mediapipe and Pytorch. Contribute to YongTaeIn/Gesture_Recognition development by creating an account on GitHub.
github.com
❏ 공식 홈페이지
공식 홈페이지 : https://developers.google.com/mediapipe/solutions/vision/gesture_recognizer
Gesture recognition task guide | MediaPipe | Google for Developers
Attention: This MediaPipe Solutions Preview is an early release. Learn more. Gesture recognition task guide Stay organized with collections Save and categorize content based on your preferences. The MediaPipe Gesture Recognizer task lets you recognize hand
developers.google.com
'인공지능 (Deep Learning) > 딥러닝 사이드 Project' 카테고리의 다른 글
| [Image Captioning] 이미지 캡셔닝 튜토리얼 (0) | 2024.05.19 |
|---|---|
| [DETR Fine Tuning] DETR 모델을 활용한 Object detection (2) | 2024.04.25 |
| [ViT] 비전 트랜스포머 코드구현 및 실행. (0) | 2023.08.11 |
| AutoFormer 코드 설명 및 적용. (0) | 2023.07.16 |
| [트랜스포머] 트랜스포머 인코더를 이용한 시계열 예측. (2) | 2023.07.13 |


